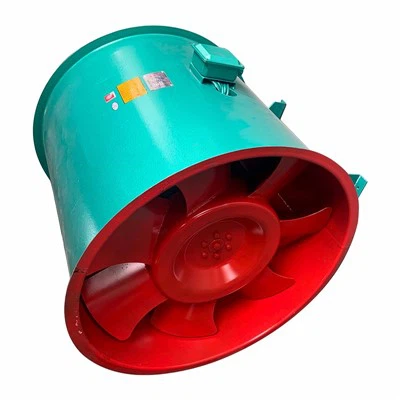

Installing an axial flow fan on a wall can significantly improve ventilation in various settings, from industrial warehouses to home workshops. As a supplier of high - quality Fan Axial Flow products, I'm here to guide you through the installation process step by step.
Pre - installation Preparation
Before you start the installation, it's crucial to gather all the necessary tools and materials. You'll need a drill, screws, a level, a measuring tape, a pencil, and of course, the axial flow fan itself. Additionally, ensure that you have the correct mounting hardware provided with the fan.
First, select the appropriate location on the wall. The location should be high enough to allow for efficient air circulation. For industrial spaces, consider areas where heat or fumes tend to accumulate. In a home environment, a workshop or a garage could benefit from an axial flow fan installed on the wall. Measure the dimensions of the fan and mark the mounting holes on the wall using a pencil. Use a level to ensure that the marks are straight and even.
Mounting the Fan Bracket
The next step is to install the fan bracket on the wall. Align the bracket with the marked holes on the wall. Use a drill to create holes for the screws. Make sure the holes are deep enough to securely hold the screws. Insert the screws into the holes and tighten them using a screwdriver. Double - check the level to ensure that the bracket is perfectly horizontal. This is important as an unevenly mounted bracket can cause the fan to vibrate and reduce its efficiency.
Connecting the Fan to the Bracket
Once the bracket is securely mounted on the wall, it's time to connect the fan to the bracket. Most axial flow fans come with pre - drilled holes that align with the holes on the bracket. Place the fan on the bracket and align the holes. Insert the provided screws through the holes in the fan and into the bracket. Tighten the screws firmly, but be careful not to overtighten as this could damage the fan or the bracket.
Electrical Connection
Before making any electrical connections, ensure that the power supply is turned off. This is a safety precaution to prevent electric shock. Locate the electrical wiring of the fan. Most axial flow fans have a power cord with a plug. If your fan requires hard - wiring, consult a professional electrician.
If you're using a plug - in fan, simply plug it into a nearby electrical outlet. For hard - wired fans, connect the wires according to the manufacturer's instructions. Usually, you'll need to connect the live, neutral, and ground wires. Once the electrical connections are made, turn on the power supply and test the fan to ensure it's working properly.
Testing and Adjustment
After the fan is installed and connected to the power supply, it's time to test it. Turn on the fan and observe its operation. Check for any unusual noises or vibrations. If you notice any issues, turn off the power supply immediately and inspect the installation.
You may also need to adjust the direction of the fan. Some axial flow fans allow you to change the direction of the airflow. This can be useful depending on your ventilation needs. For example, in a hot environment, you may want the fan to blow air out of the room, while in a cold environment, you may want it to draw fresh air in.
Benefits of Using Axial Flow Fans
Axial flow fans offer several benefits. They are highly efficient at moving large volumes of air in a straight line. This makes them ideal for applications where rapid ventilation is required. In industrial settings, they can help remove heat, dust, and fumes, improving the working environment. In homes, they can be used to ventilate attics, basements, and workshops.
If you're looking for specific types of fans, we also offer Sidewall Exhaust, which are designed for side - wall installation and are great for exhausting stale air. Jet Fans for Tunnel Ventilation are specifically engineered for tunnel applications, providing powerful ventilation in confined spaces. And for high - temperature environments, our High Temp Duct Fan can withstand extreme heat while maintaining efficient operation.


Maintenance Tips
To ensure the long - term performance of your axial flow fan, regular maintenance is essential. Clean the fan blades regularly to remove dust and debris. This will improve the fan's efficiency and prevent overheating. Check the mounting hardware periodically to make sure it's still tight. Loose screws can cause the fan to vibrate and potentially damage the fan or the wall.
If you notice any signs of wear or damage, such as a noisy motor or a damaged blade, replace the faulty parts as soon as possible. It's also a good idea to lubricate the motor bearings according to the manufacturer's instructions.
Conclusion
Installing an axial flow fan on a wall is a relatively straightforward process that can bring significant benefits to your space. By following the steps outlined above, you can ensure a successful installation. As a Fan Axial Flow supplier, we are committed to providing high - quality products and excellent customer service. If you're interested in purchasing our axial flow fans or have any questions about the installation process, please feel free to contact us for further details and to discuss your specific needs. We look forward to assisting you in improving your ventilation system.
References
- Manufacturer's installation guides for axial flow fans
- Industry standards for ventilation and fan installation